So lately I’ve been learning about Kubernetes and figured I should do a blog post outlining some of things I’ve learnt and the resources I’ve used.
Writing blog posts is something I used to do more of a long time ago. I figured I’m learning things, why not share them with the world.
What is Kubernetes
Kubernetes (K8s) is an open-source system for automating deployment, scaling, and management of containerized applications. - https://kubernetes.io/
This provides much of the simplicity of Platform as a Service (PaaS) with the flexibility of Infrastructure as a Service (IaaS), and enables portability across infrastructure providers. - Algolia
Kubernetes Terminology
Pods
A pod is a collection of containers sharing a network and mount namespace and is the basic unit of deployment in Kubernetes.
Deployments
A deployment is a supervisor for pods, giving you fine-grained control over how and when a new pod version is rolled out as well as rolled back to a previous state.
Services
A service is an abstraction for pods, providing a stable, so called virtual IP (VIP) address.
Practical Example
Prerequisites
• Homebrew
•
Docker
• Kubectl - brew install kubectl
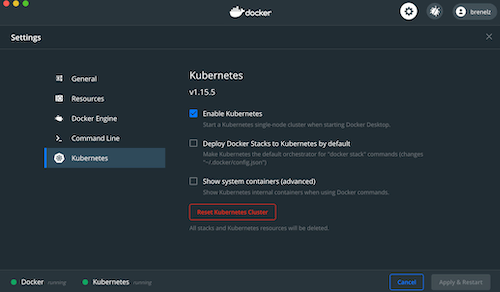
Next enable Kubernetes from your Docker settings.
Create deployment manifest (deployment.yml)
apiVersion: apps/v1
kind: Deployment
metadata:
  name: simple-deployment
spec:
  replicas: 2
  selector:
    matchLabels:
      app: simple-deployment
  template:
    metadata:
      labels:
        app: simple-deployment
    spec:
      containers:
      - name: simple-pod
        image: mhausenblas/simpleservice:0.4.0
        ports:
        - containerPort: 9876
K8s objects are represented by yml files. Most objects have an apiVersion, kind, metadata, and spec.
Replicas states how many different pods you want to create. This is where you can easily scale up the number of pods depending on the traffic to your app.
The other thing to note is the deployment matches pods with a specific label
which in this case is app: simple-deployment. This must match up with the
metadata labels pointed out in the template.
The template is you guessed it, the template that the pods will follow. The important thing is the containers part in spec. The image specified here is what will be deployed. This would normally be a built image pushed up to docker hub or something.
Lastly containerPort sets up which port the pod should be listening to on your image.
Apply deployment manifest
kubectl apply -f deployment.yml
View pods
kubectl get pods
Create service manifest (service.yml)
apiVersion: v1
kind: Service
metadata:
  name: simple-internal-service
spec:
  type: NodePort
  ports:
  - port: 80
    targetPort: 9876
    nodePort: 30007
  selector:
    app: simple-deployment
The new things to note here is the kind has been changed to Service. Also take note that it’s using a type of NodePort. This isn’t something you would use for production but something used to build something simple out.
Now the 3 ports listed can be confusing so I will try and explain the difference. The first port is what the service itself will be listening on. In this case you could actually access it within the cluster at http://simple-internal-service. The second port is the port you are targeting on the pods you’ve created. As you can see in our deployment above it is 9876. Lastly the nodePort is the port to which external traffic will get access to this service. In this case it allows it to be accessed at localhost:30007 after it’s applied.
Apply service manifest
kubectl apply -f service.yml
Curl your endpoint to see it working
curl http://localhost:30007/health
I hope you’ve enjoyed this super quick rundown of things.
Learning Resources
• K8s docs (built by my good
friends at Gearbox)
•
Udemy
course
•
GKE
quickstart on Google Cloud
•
Kubernetes by example
• Algolia’s hands
on examples